iEasyClick · iOS USB
Apple Cluster USB Edition — Beginner Install Guide
For first-time Apple cluster USB edition users: install step by step with screenshots — product downloader → offline main IPA → trust & permissions → start automation → group screen control.
If below iOS 15 system version, first read the USB detailed guide: iOS USB screen mirroring tutorial.
After install, continue with: New UI operation guide · iOS USB screen mirroring tutorial · PC hardware and customer cases
Before you start
- A Windows PC (install the control center via the product downloader)
- An iPhone connected to the PC with a USB cable
- i4Tools / AiSi assistant (to install the IPA)
- Access to the official download area (to get the offline main IPA)
- PC hardware and real customer builds: iOS USB PC hardware and customer cases
- If below iOS 15 system version, first read iOS USB screen mirroring tutorial
- Before install and use, turn off antivirus, Windows Security / Security Center, and the firewall; if issues persist, disable them and restart the PC
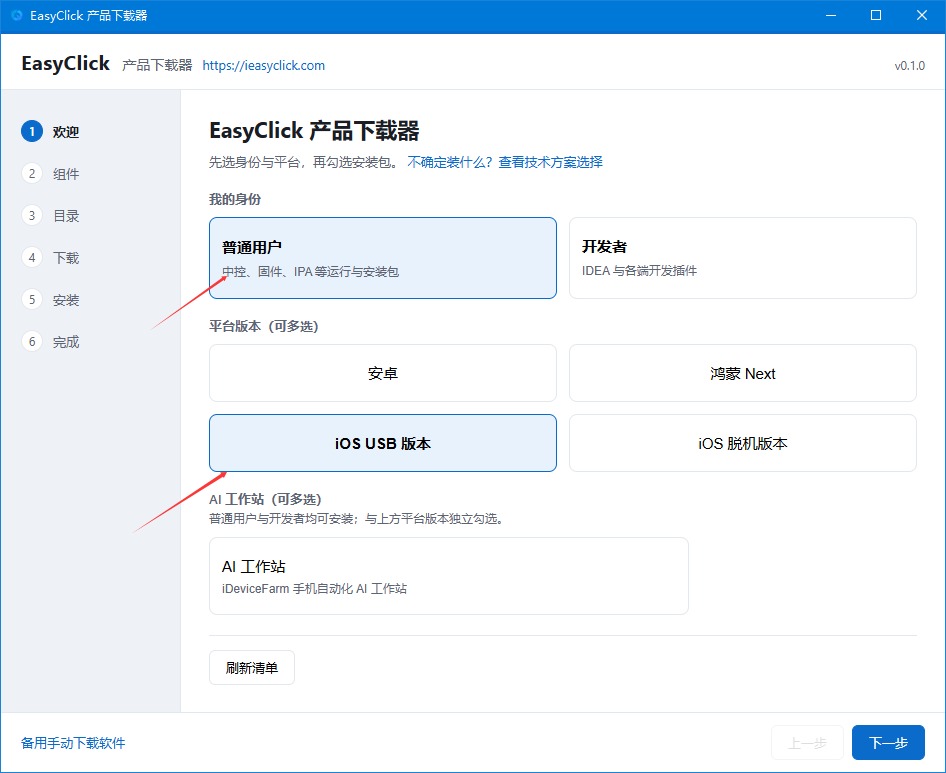
1 Open the product downloader and pick identity / platform
Download and open the iEasyClick product downloader:
- On this site: Download the product downloader
- Software downloads: Download area
After it opens:
1. Set My identity to Regular user
2. Under Platform version, check iOS USB version
3. Click Next
2 Select required components
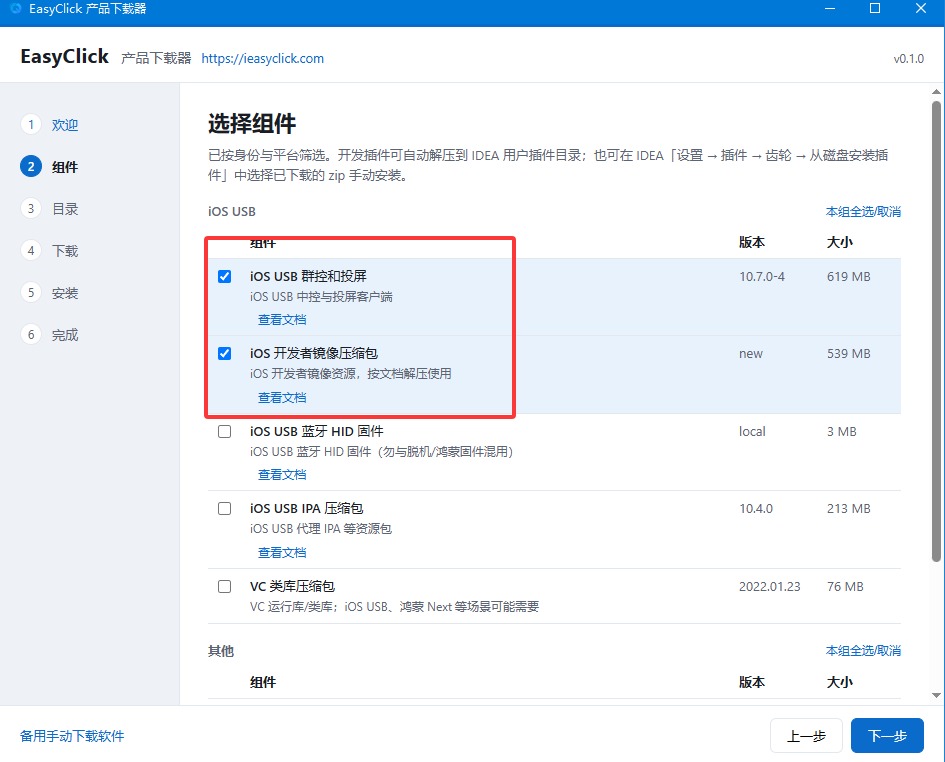
On the Components page, check both required items:
- iOS USB cluster control & screen mirroring
- iOS developer disk image package (required — download it; needed after USB connect for mounting the image and starting automation)
Then click Next.
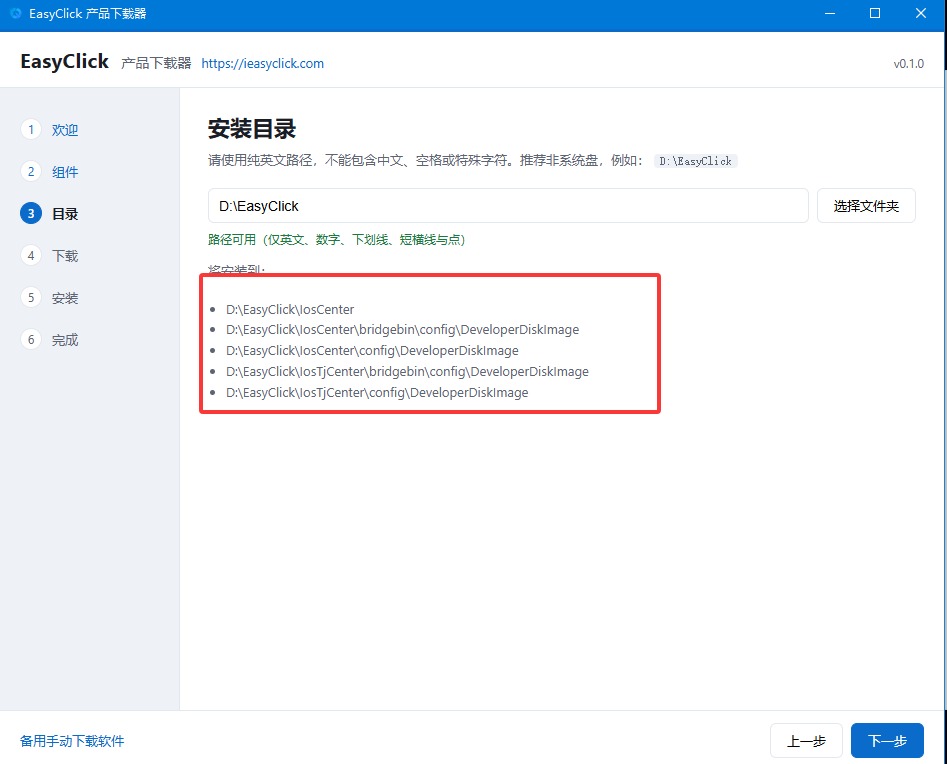
3 Choose the install directory
Use a pure English path — no Chinese characters, spaces, or special symbols. The default like D:\iEasyClick is usually fine. Confirm and click Next.
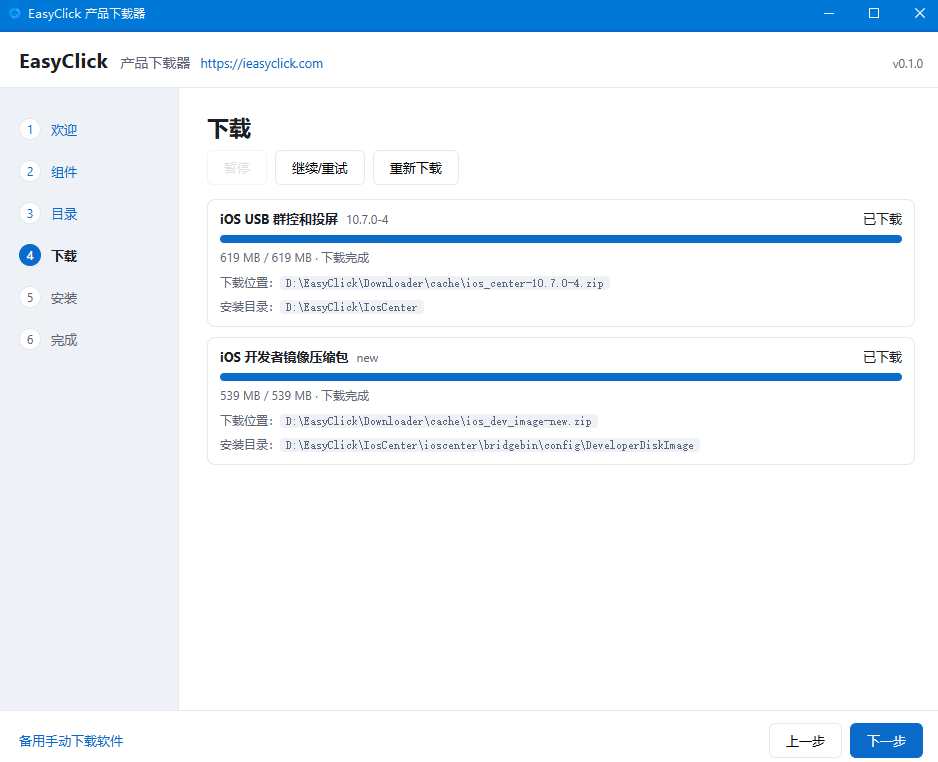
4 Wait for downloads to finish
The download page pulls cluster control & mirroring and the developer disk image. When both show Downloaded / Complete, click Next.
5 Finish install and open the cluster folder
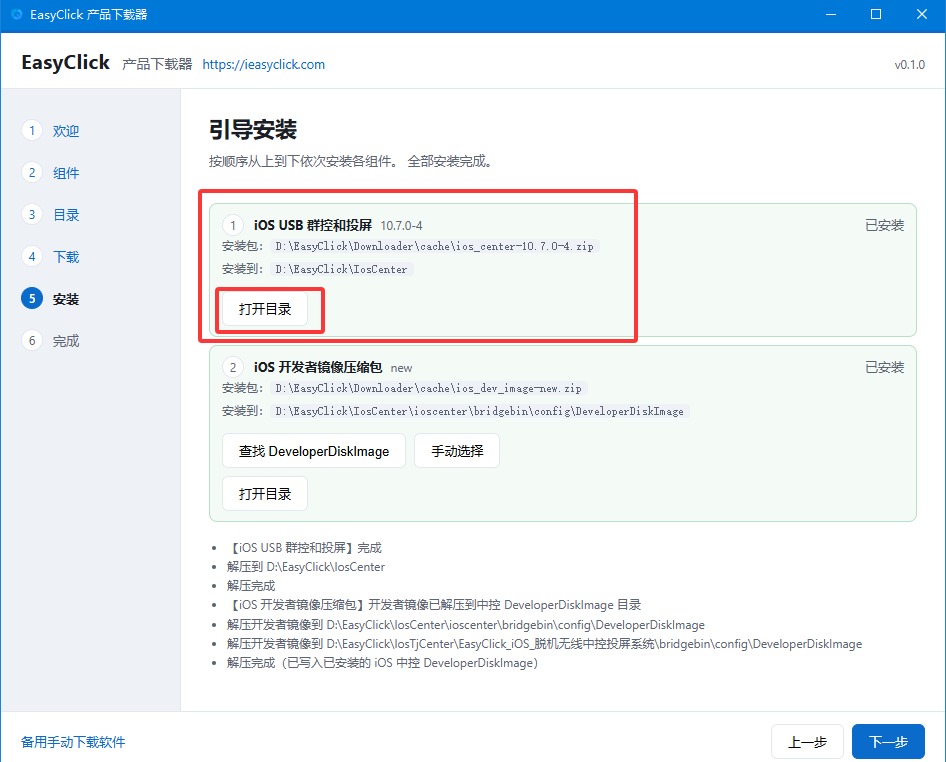
Complete the installer. On the finish page, find iOS USB cluster control & screen mirroring, then click Open folder.
6 Start the control center and sign in
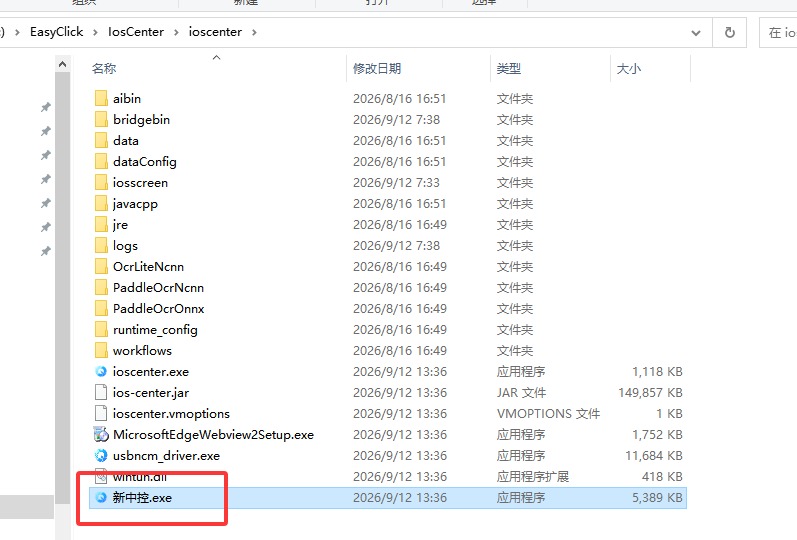
In the install folder, double-click 新中控.exe to open the control center. Register and sign in as prompted.
If the control-center status bar stays red and the center never comes up, the PC is often missing the Visual C++ (VC) runtime. Use the product downloader to download the VC libraries zip, install it, then restart the computer and open the control center again.
7 Download the offline main IPA
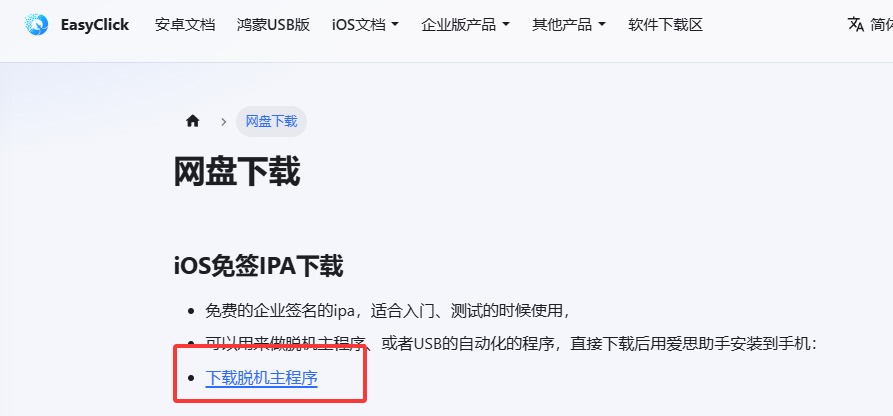
Next, install the IPA on the phone: open the site Download area, then click Download offline main app to get the file.
If the browser warns that the file is risky, choose Keep — do not let it delete the IPA.
8 Import and install with i4Tools
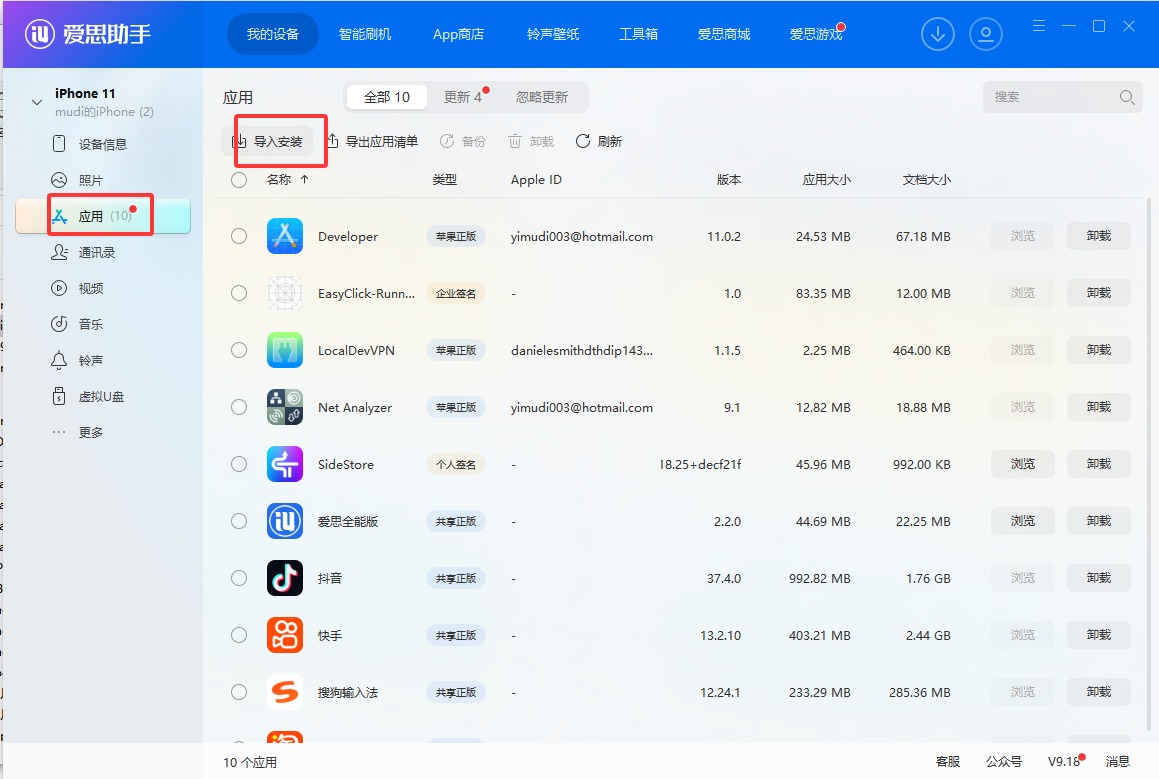
1. Open i4Tools (AiSi) and confirm the phone is detected
2. Open the phone Apps section
3. Click Import install and select the IPA you downloaded
9 Open the installed app
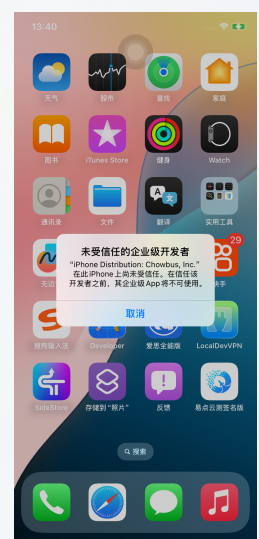
After install, open 易点云测签名版 (or the icon for your offline main app). The first launch usually shows app verification / trust prompts.
10 Trust the profile in Settings
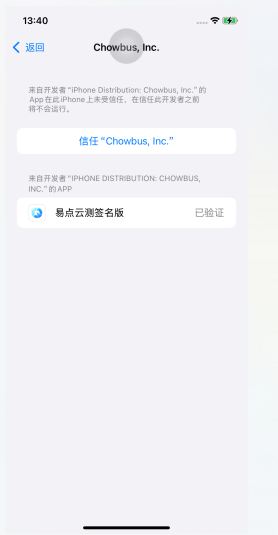
On the phone go to Settings → General → VPN & Device Management (wording may vary), find the new profile / developer app, and tap Trust.
After trusting, turn on Developer Mode (required on iOS 16+; otherwise automation / mirroring often fails). iOS versions below 16 do not have Developer Mode — you do not need to turn it on.
1. On the phone: Settings → Privacy & Security → Developer Mode, enable it, restart when prompted, then confirm again
2. Or in the control center device list, right-click the device → Enable Developer Mode
3. Or in i4Tools / AiSi, click Live screen / Real-time mirroring: if it prompts you to enable Developer Mode, follow that prompt to turn it on
11 Grant app permissions
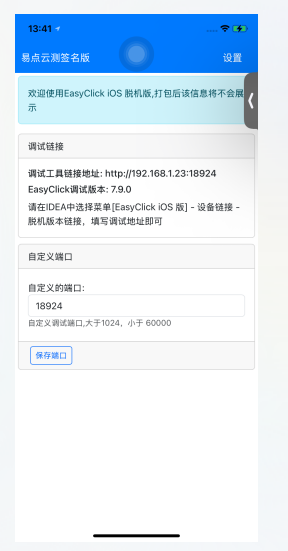
Open the app again after trusting. Allow all permission prompts. You can also finish permissions under in-app Permission grant.
12 Start automation in the control center
Back in the control center, confirm the phone is connected with a USB cable.
Developer disk image check:
1. Make sure the downloader checked and downloaded the iOS developer disk image package
2. Plug in the device over USB, then open the control center
3. Click the Developer disk image button in the control center and check the status: if it shows Mounted / Flashed (已刷入), the image was applied successfully
4. After the phone reboots, the image usually clears — you must mount / flash it again
iOS 15.8: mounting often fails — use i4Tools / AiSi → Live screen once, then try again. iOS 15.8 is poorly compatible; avoid this version if you can.
If the exact version image is missing: under the control-center install dir, open bridgebin\config\DeveloperDiskImage, copy a nearby version folder and rename it (e.g. no 27.0 → copy 26.5 and rename to 27.0), restart the control center and iPhone, reconnect over USB, then confirm Mounted / Flashed via the Developer disk image button.
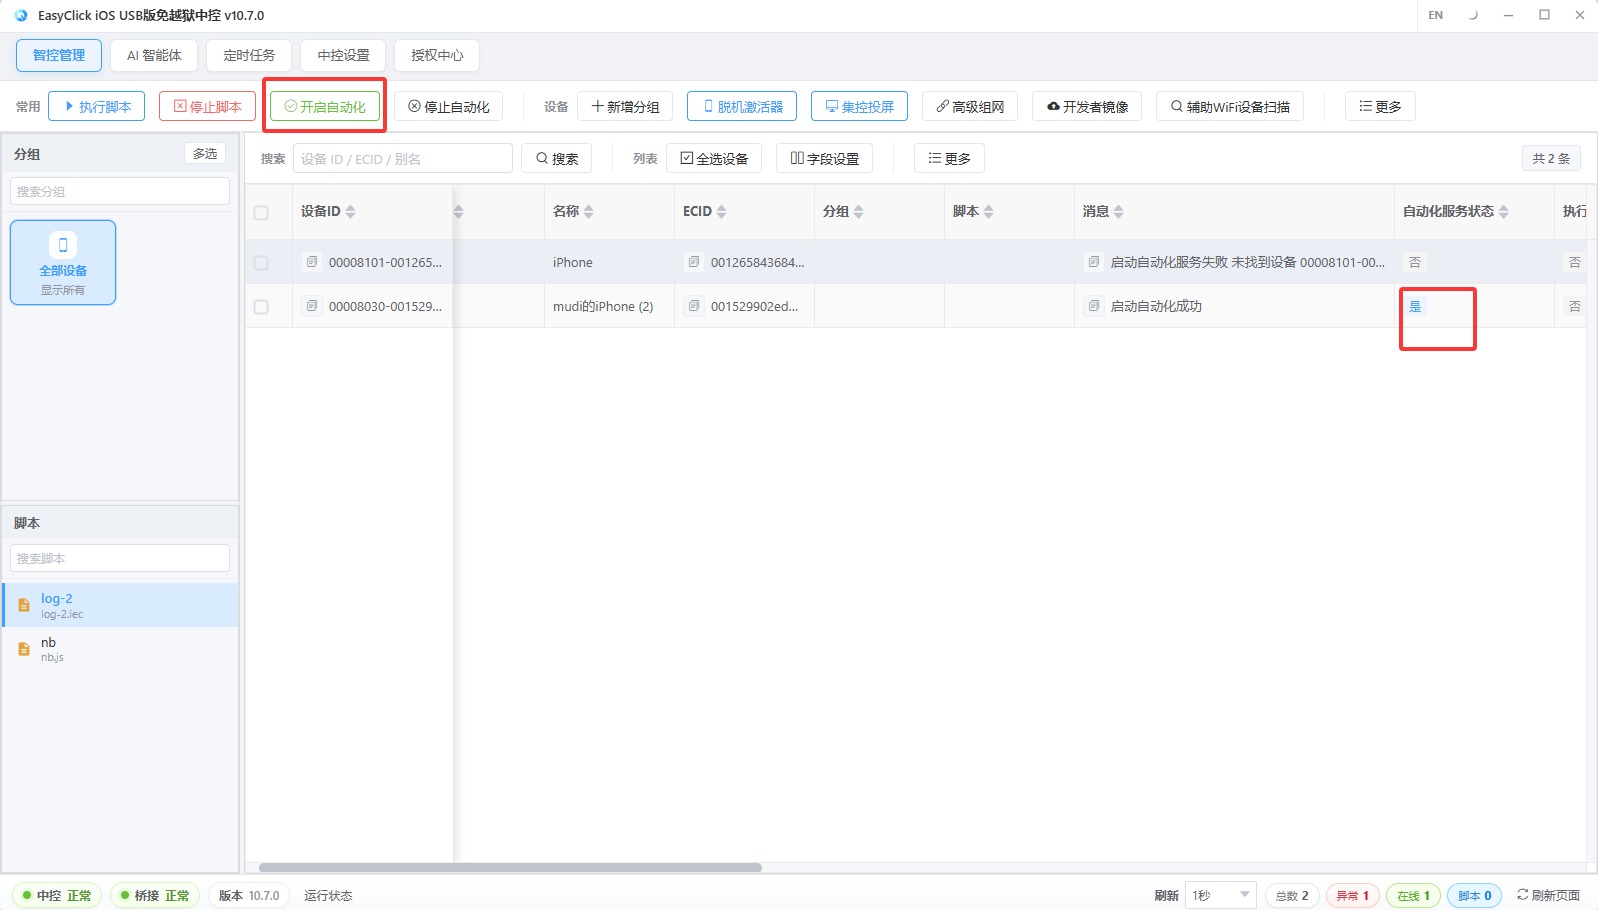
Click Start automation. After a moment, automation status should become Yes.
If it never becomes Yes, right-click the device → Test automation and troubleshoot from the error.
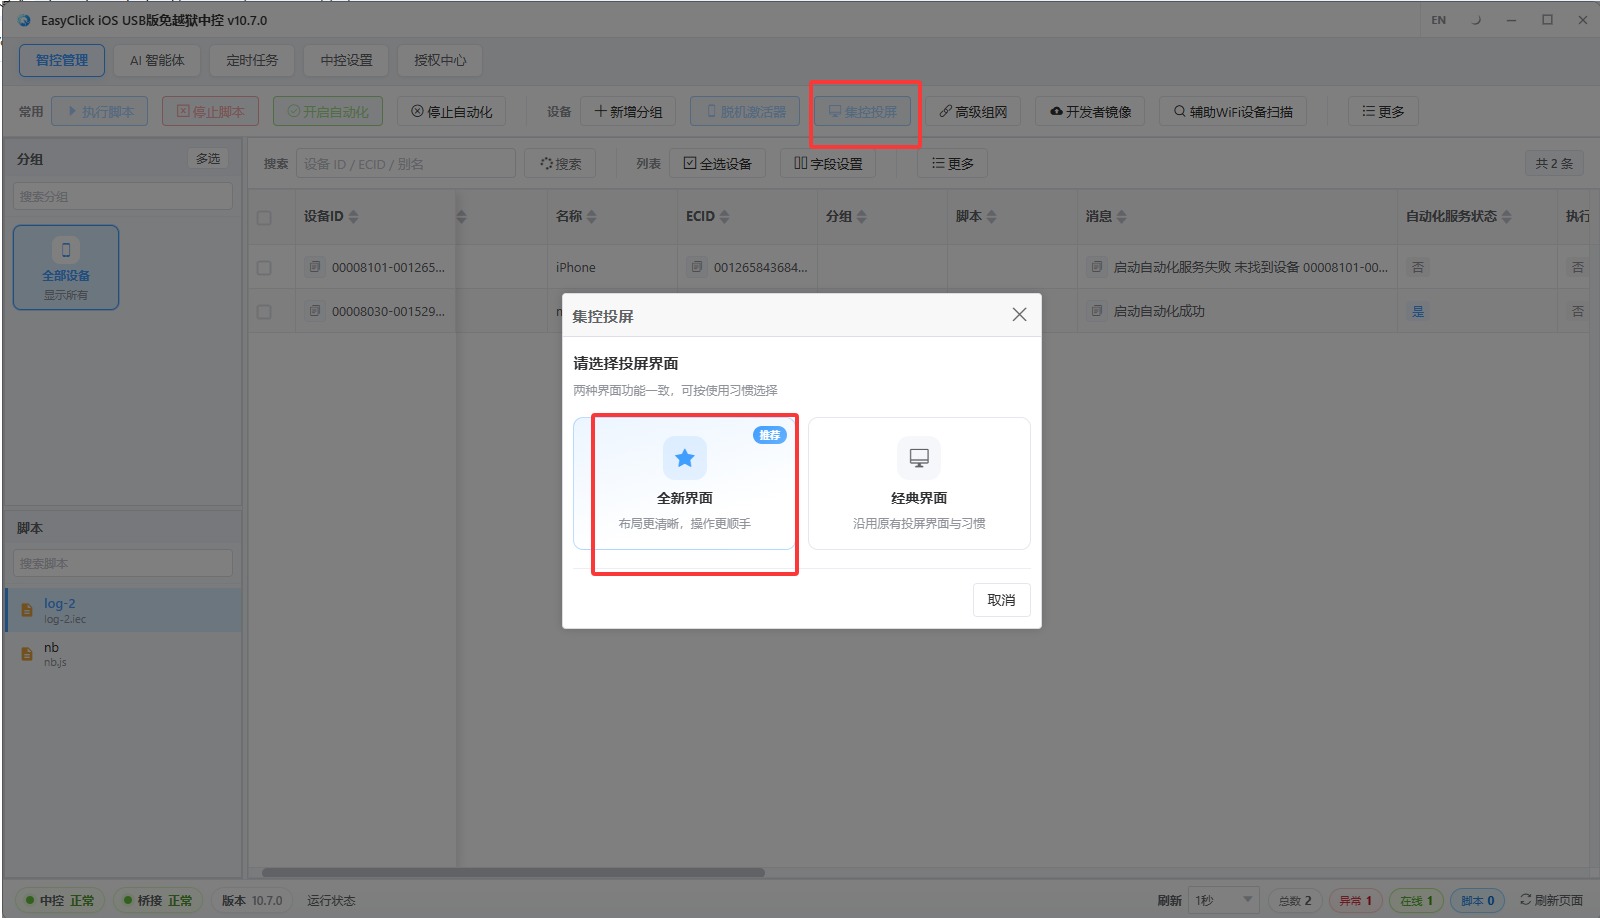
13 Open group screen control (New UI)
In the control center click Group screen control, choose New UI, and open the mirroring window.
14 Check the USB mirroring license
If you see a missing or expired USB screen mirroring license: buy it from your reseller or the official channel, then bind it in the control center License center.
A USB device license is for running scripts. A USB screen mirroring license is what you need to mirror and operate the phone. Do not mix them up.
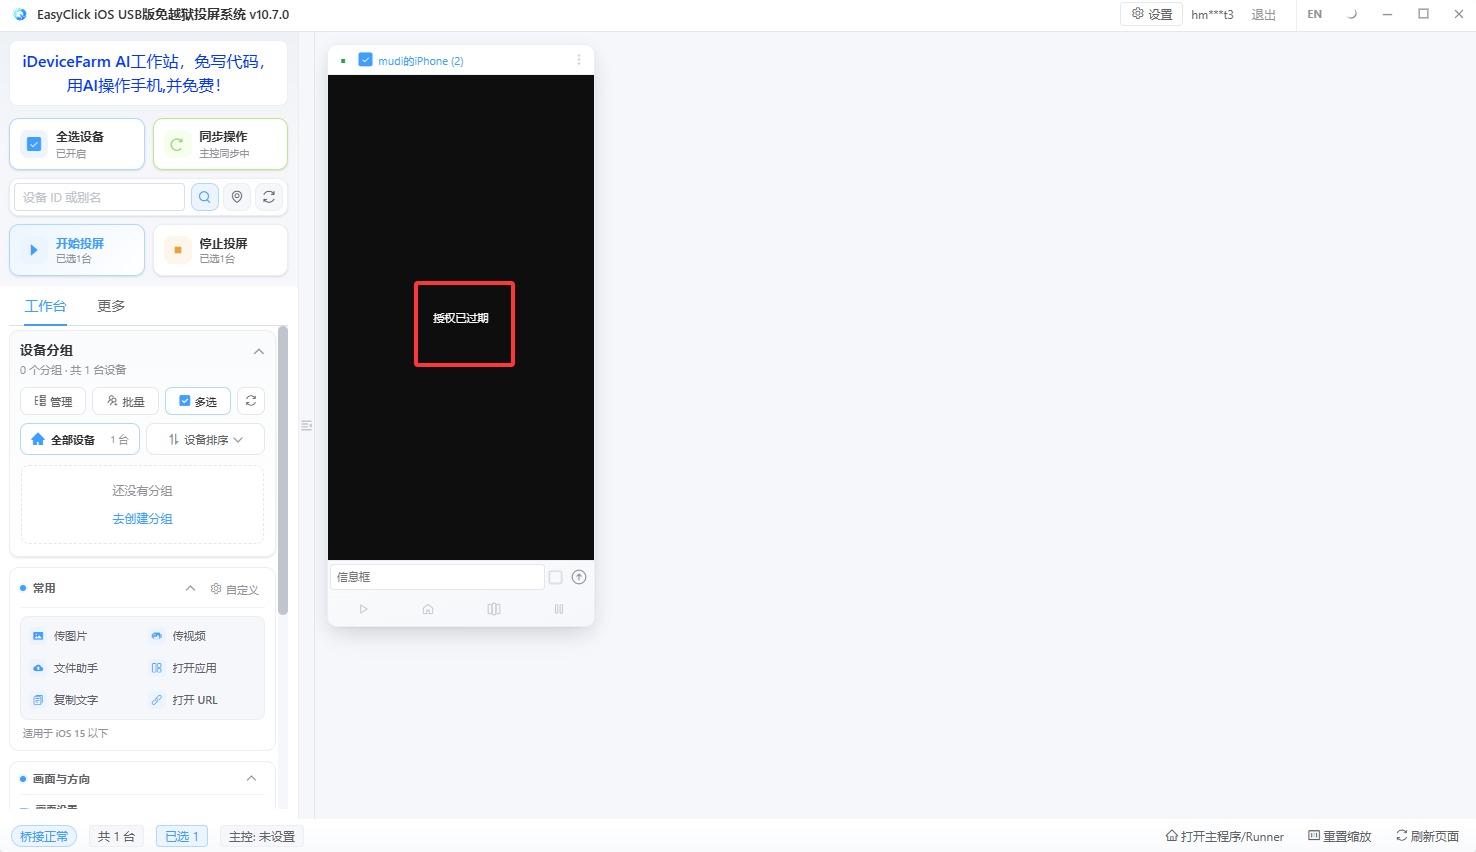
Open License center, select one device, and click Batch authorize. Or right-click the device → Add license and choose USB screen mirroring license.
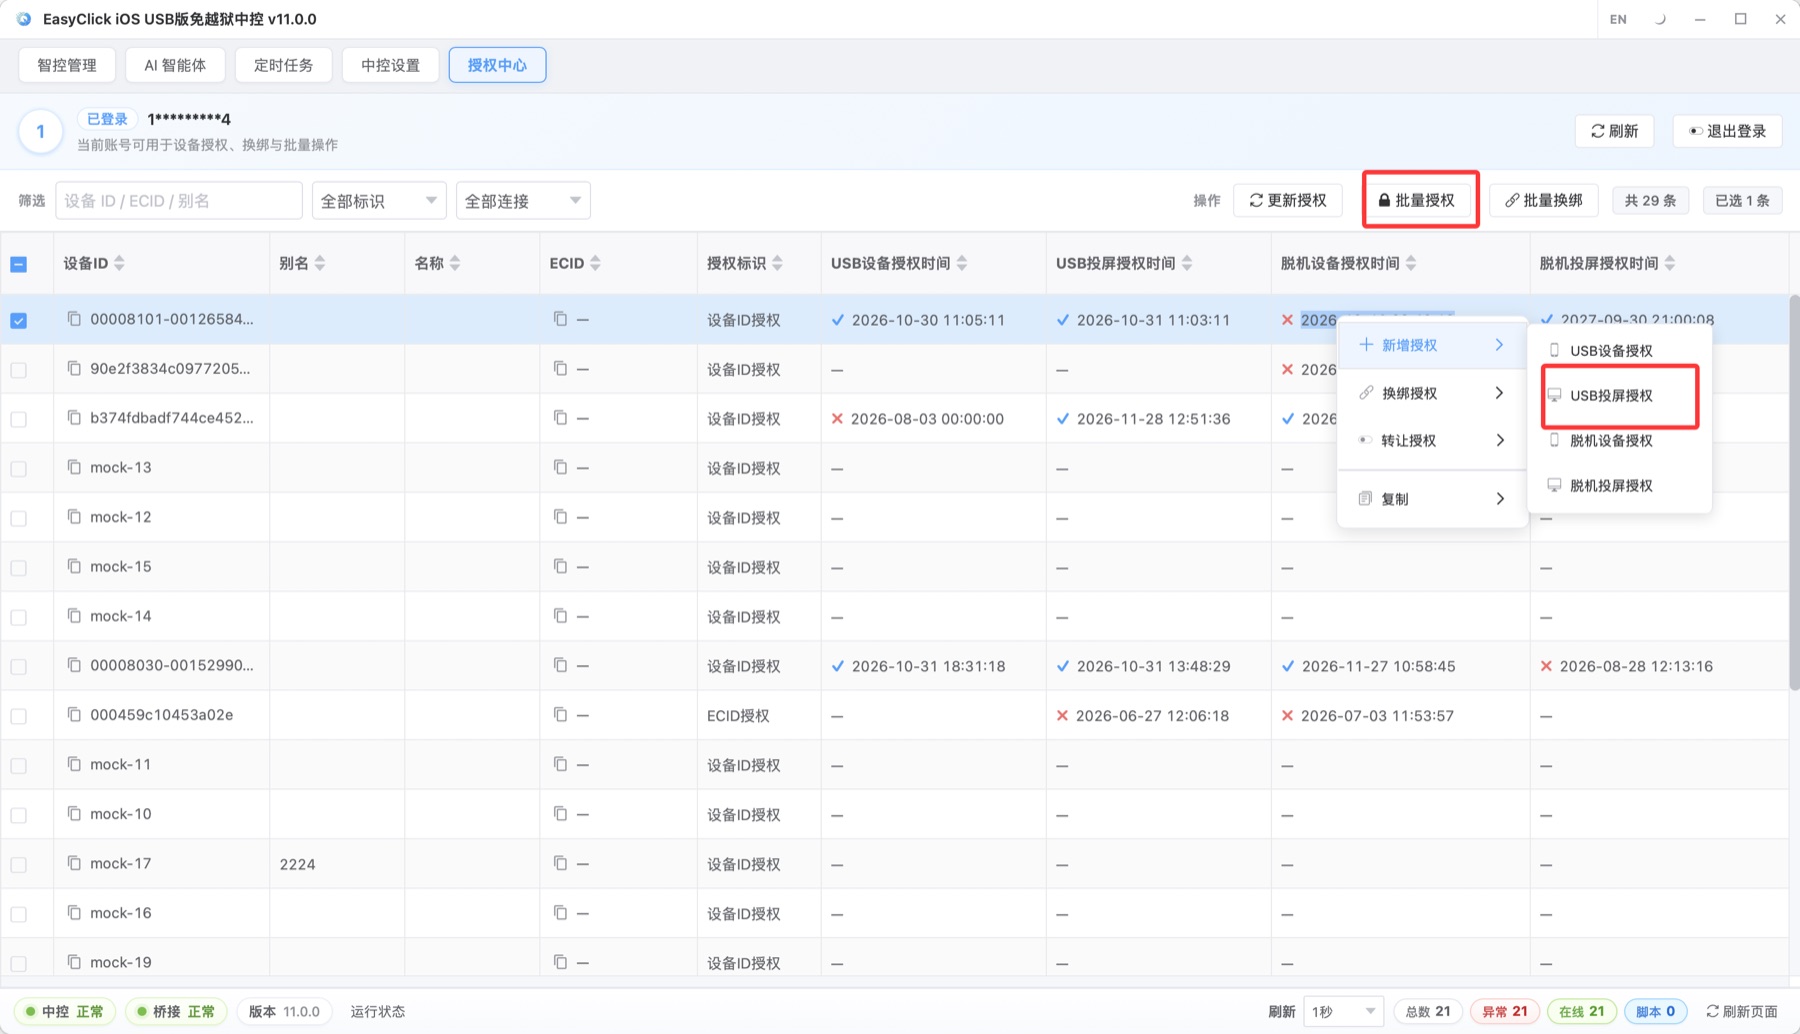
In the dialog, set the license type to USB screen mirroring license, then click Start authorization.
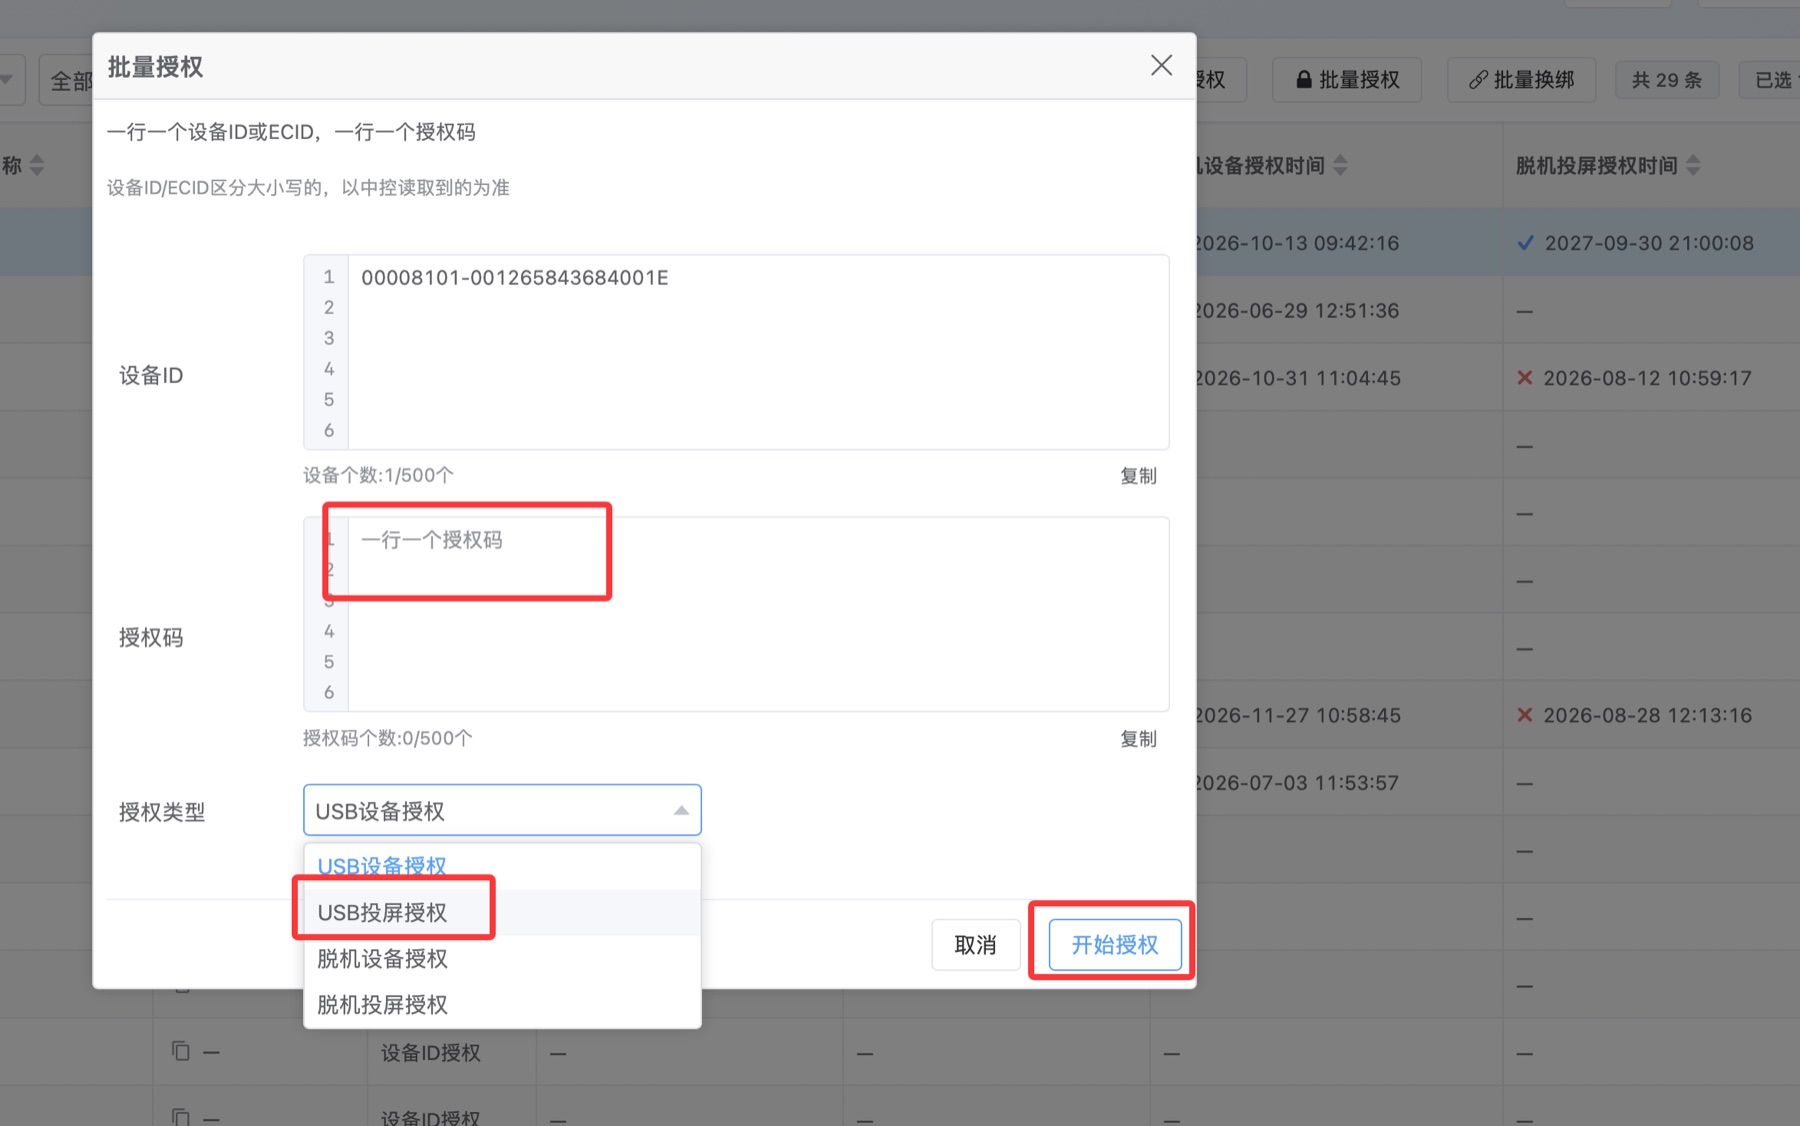
15 Mirror again and confirm the screen
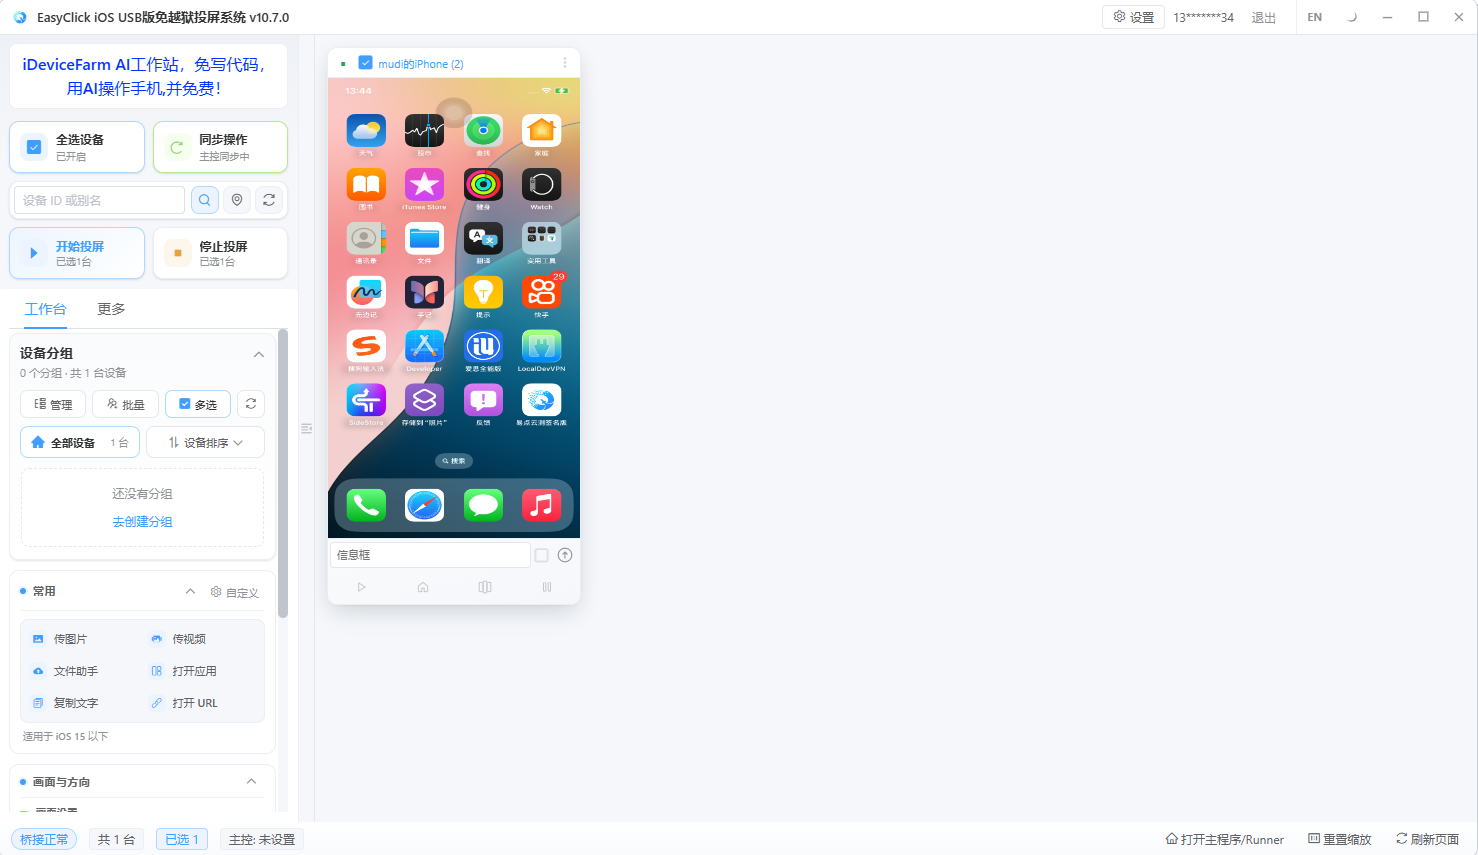
With a valid license, start mirroring again — you should see the phone screen.
16 More advanced settings
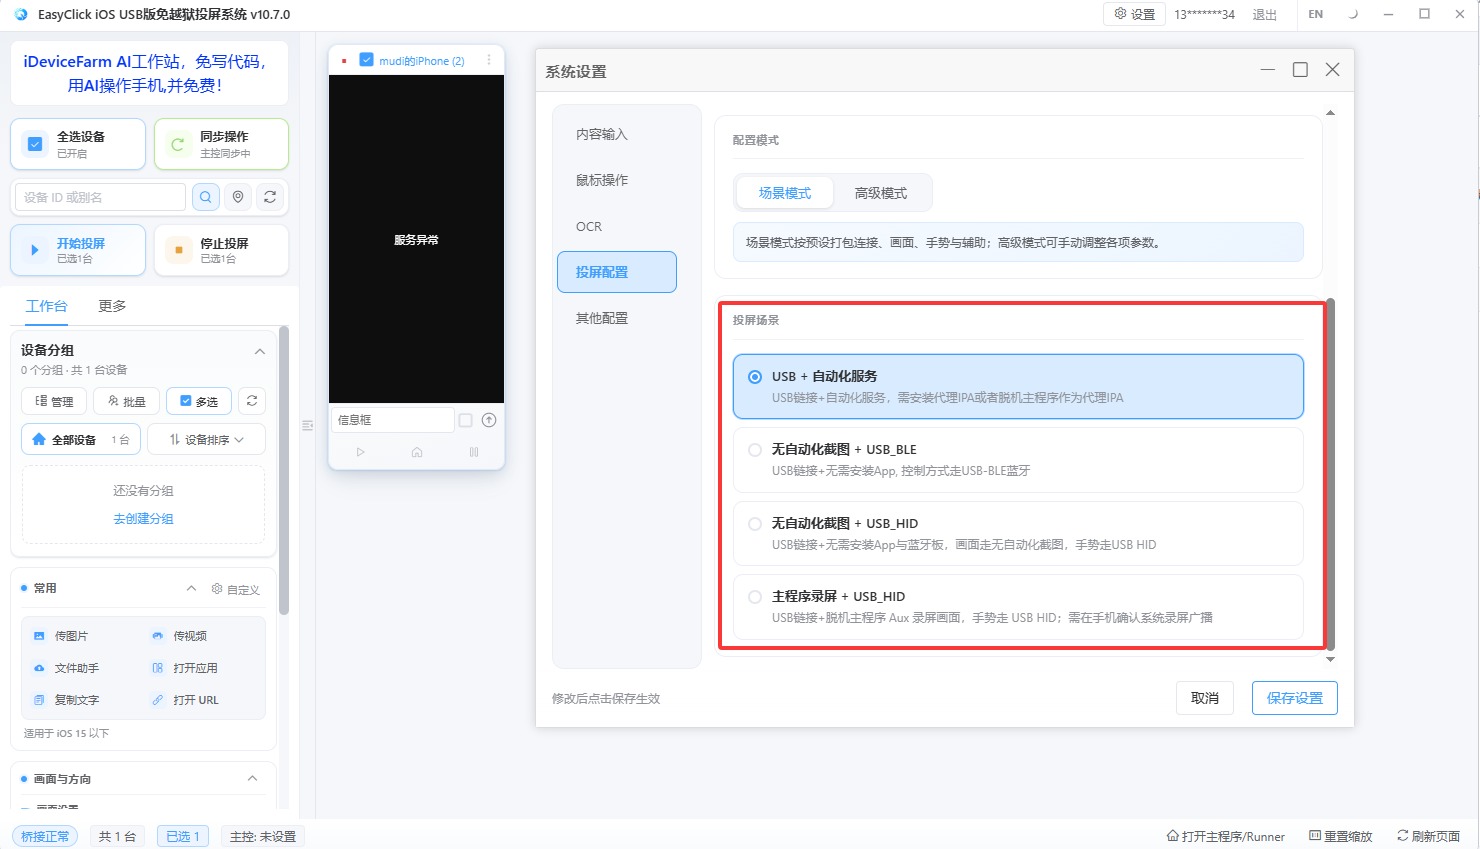
In the mirroring window System settings you will find more options (scene modes, per-screen config, etc.). Tune them for your workflow.
What to do next
- Screen mirroring operations: New UI operation guide
- Images, proxy, and full reference: iOS USB screen mirroring tutorial
- How to pick a PC: PC hardware and customer cases
- Legacy UI: Legacy UI guide
Common pitfalls
- Missed / did not download the developer disk image → automation / mirroring often fails
- Control center Developer disk image is not Mounted / Flashed → reconnect over USB and remount; remount again after every reboot. On iOS 15.8, first use i4Tools / AiSi → Live screen once, then remount; avoid iOS 15.8 if you can
- Exact version image missing → under the control-center install dir, open
bridgebin\config\DeveloperDiskImage, copy a nearby version folder and rename it (e.g. 26.5 → 27.0), restart the control center and iPhone, then remount; check via the Developer disk image button - Install path has Chinese or spaces → reinstall to a pure English path
- Browser deleted the IPA → download again and choose Keep
- Profile not trusted / Developer Mode off (iOS 16+ only; not present below 16) / permissions missing → automation will not start
- Only a USB device license (scripts), no USB screen mirroring license (mirroring) → the device connects but mirroring reports expired
- Odd failures (cannot connect, automation fails, black screen, etc.) → confirm the image is mounted first; restart the iPhone only if needed (then remount), and quit/reopen the cluster control software
- Control-center status bar stays red / center will not start → PC may be missing VC libraries; download the VC libraries zip from the product downloader, install it, then restart the computer and open the center again
- Automation start fails with
use of closed network connection→ in control center settings, set Local bridge → Automation connection to Use a new connection each time, then retry; do the same if mirroring UI cannot start automation - Antivirus / Security Center / firewall still on → may block programs or local traffic; turn them off, then restart the PC and retry
- Automation start fails with
receive packet: Invalid Service→ usually Developer Mode is off on iOS 16+ (not present below 16); enable it in the trust-profile step above, then retry - Error like
write tcp 127.0.0.1:…->127.0.0.1:27015: wsasend: An established connection was aborted by the software in your host→ usually the firewall; turn it off and restart the PC. You can also use i4Tools / AiSi → Driver repair, then Reset Winsock when prompted, and retry - Cluster control does not show the phone → first check in i4Tools / AiSi whether the device is detected; then run Driver repair, Reset Winsock, turn off antivirus / firewall / Security Center, and restart the PC before opening the control center again
- Mirroring lag / stutter → No automation screenshot mode is inherently slower; switch to main-app recording or automation mode for speed. If automation mode still lags or delays, check PC / cable / hub setup: iOS USB PC hardware and customer cases
Enable USB HID mode (optional)
USB HID taps and swipes over the USB cable. It does not need a Bluetooth or OTG board. The phone must be iOS 17 or later. On older iOS, keep using Start automation / USB + automation service from earlier steps.
1. Open the mirroring client and go to System settings → Scene mode
2. Pick one:
- No automation screenshot + USB_HID: no app on the phone; USB connection is enough (simplest)
- Main-app recording + USB_HID: smoother picture; the offline main IPA must already be installed. The system first captures screenshots to show the screen, then opens the main app and shows the live-broadcast dialog — tap Start Broadcast (开始直播)
3. Click Start mirroring. If you chose main-app recording, you will first see the captured screen, then the main app opens with the broadcast prompt — tap Start Broadcast, then use the mouse to tap and swipe
If mouse taps do nothing: on the device thumbnail or device list, right-click → USB HID → Rebuild USBHID session, then try again.
More detail: New UI operation guide and USB HID events.
Troubleshooting
Cluster control does not show the phone
If the control center / cluster UI does not list the phone:
1. Confirm the USB cable is plugged in and the phone has tapped Trust This Computer
2. Open i4Tools / AiSi and check whether it detects the device (if AiSi also cannot see it, try another cable / USB port first, then continue)
3. In i4Tools / AiSi, run Driver repair; when the post-repair dialog appears, click Reset Winsock
4. Turn off antivirus, firewall, and Security Center
5. Restart the PC, reopen the control center, plug the phone in again, and check whether it appears
Automation start fails with receive packet: Invalid Service
If Start automation fails with an error containing receive packet: Invalid Service, Developer Mode is usually off on iOS 16+. iOS versions below 16 do not have Developer Mode — you do not need to turn it on. On iOS 16+, turn it on as in the trust-profile step above (Settings, control-center right-click, or i4Tools live-screen prompt), confirm it stays on after any required reboot, then retry.
Error wsasend: An established connection was aborted by the software in your host
If you see something like:
write tcp 127.0.0.1:62200->127.0.0.1:27015: wsasend: An established connection was aborted by the software in your host
this is usually the local firewall (or Security Center / antivirus) blocking localhost traffic. Try:
1. Turn off the firewall, Security Center, and antivirus, then restart the PC and open the control center again
2. In i4Tools / AiSi, run Driver repair; when the post-repair dialog appears, click Reset Winsock, and keep the firewall off
3. After repair / reset, restart the PC, then reopen the control center and start automation again
Automation start fails with use of closed network connection
If Start automation fails in the control center or mirroring UI with an error like use of closed network connection:
1. Open Control center settings
2. Find Local bridge → Automation connection
3. Set it to Use a new connection each time
4. Try Start automation again
If the mirroring UI cannot start automation either, make the same change and retry.
Mirroring lag or stutter
If the mirrored screen lags or stutters:
1. No automation screenshot mode is inherently slower — that is expected
2. For a faster picture, switch to main-app recording or automation mode, then reopen or refresh the mirroring window
3. If automation mode still lags or delays, check PC, cable, and hub setup: iOS USB PC hardware and customer cases